Hello Everyone,
In this post I'm uploading a report that I created based on a Facebook marketing campaign I ran for my website, soupgraphicdesign.weebly.com . Please feel free to check out my report, my website or my Facebook page.
Showing posts with label Making Your Social Media. Show all posts
Showing posts with label Making Your Social Media. Show all posts
Tuesday, December 8, 2015
Tuesday, December 1, 2015
Setting Up Goal Conversions
Hello Everybody,
In this post I'm going to show you how I set up goal conversions for my very on website.
This is my website.

I decided to set up a goal for people to fill out my contact page.

Once users fill out the form and hit the submit button they are taken to my thank you page.

So I set up Google Analytics with a goal conversion that will let me know when people make it to this page, which they can only get to by filling out the contact form, which is what I want people to do.
Keep in mind for this to work, you will need Google Analytics already connected to your website. First select which website (if you have multiple sites connected to your analytics) you want to add the goal conversion to, and select the admin option at the top of your Google Analytics page. Once there select the goal option.

Once you have selected the goal option you will be taken to a page with your current goals, again if you have any, and select the red button to add a new goal.

One you have selected that you will be able to add specifics about the goal you are setting up. I for one hit custom.


Next you add the page you want your destination to be. You add the words that are after the / part of the url, including the / . Then hit save.

And there you have it, that's how you set up goal conversions through Google Analytics.
On a side note, please check out my website and see all the art and design possibilities I have to offer. And this way I have some analytics to poke around with.
In this post I'm going to show you how I set up goal conversions for my very on website.
This is my website.

I decided to set up a goal for people to fill out my contact page.

Once users fill out the form and hit the submit button they are taken to my thank you page.

So I set up Google Analytics with a goal conversion that will let me know when people make it to this page, which they can only get to by filling out the contact form, which is what I want people to do.
Keep in mind for this to work, you will need Google Analytics already connected to your website. First select which website (if you have multiple sites connected to your analytics) you want to add the goal conversion to, and select the admin option at the top of your Google Analytics page. Once there select the goal option.

Once you have selected the goal option you will be taken to a page with your current goals, again if you have any, and select the red button to add a new goal.

One you have selected that you will be able to add specifics about the goal you are setting up. I for one hit custom.

Give a name of your goal, and pick which type of goal you are trying to set up. My goal in this exercise would be a destination goal because I want people to get to a particular page on my site.

Next you add the page you want your destination to be. You add the words that are after the / part of the url, including the / . Then hit save.

On a side note, please check out my website and see all the art and design possibilities I have to offer. And this way I have some analytics to poke around with.
Monday, October 12, 2015
Making Your Social Media, Analyzing Facebook Ads Campaigns
Hello Everybody,
Remember how we talked about the popularity and importance of setting up Facebook Ads and then the process of actually setting Facebook Ads up? In this post I'm going to go over the results.
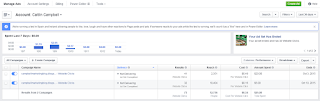
When first logging onto Facebook to check the progress of your ads you will come to screen much like the one featured above. I ended up doing two separate campaigns for this blog with only slight differences in wording and audience but all using the same image. So now let's go through and compare and analyze the differences in results.


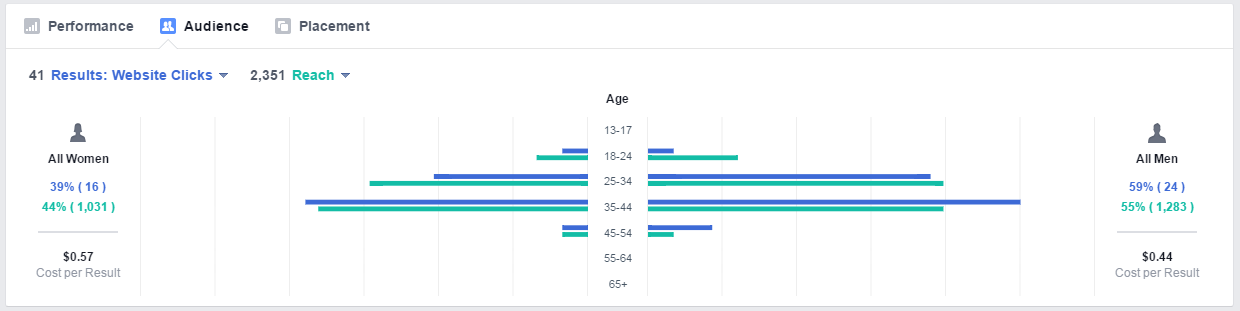
First I am going to focus on the $20 ad that I placed from September 29th- October 3rd. This ad ended up resulting in 41 clicks and reached 2,351 people and costed me about $0.49 per click. With this campaign I had 3 variations in my ad, focusing on one of the three main marketing topics covered by this blog (SEO, Social Media, and Google Analytics). I had very slight differences in my target audience from this ad compared to my second campaign.
Overall this campaign applied more so towards males especially in the 35-44 age range. This I found surprising, I was expecting my blog to be more popular with the upper 20 somethings. Most of the traffic that I ended up getting came through Mobile News Feed, which if you read one of my recent posts on how frequently people use their smartphones and Facebook, shouldn't be surprising in the least.
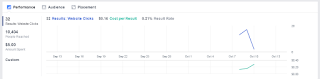

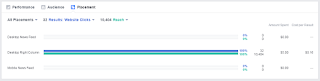
This second campaign I ran for two days from October 8th- October 10th, for only $5. I was able to reach 10,404 people and got 32 website clicks and paid around $0.16 for each of them. Surprising results for only a fourth of what was spent on the first ad. These major differences I am contributing to the placement of the ad. For this second ad I had disabled the "display in news feed" option. Meaning that while I had taken away all my mobile ads for the desktop right column ad I got to pay substantially less for similar results. Again my ad appealed to males more so than females, but in substantially larger percentage than the last campaign. This time my ad appealed more so towards the 18-24 years old demographic, with very few older generation views. This I find surprising because I assumed that my mobile ads would be more appealing to younger generations than the ones that actually ended up clicking it.

Next I went to my Google Analytics account to see what my clickers of my ad actually ended up doing once they found themselves at my blog. It's a little disheartening to see that my bounce rate is as high as 77.17%, meaning that more that 3/4th of my viewers clicked away before actually exploring my blog or visiting other pages. The average session duration was just under two minutes, meaning that odds are my blogs aren't actually getting read thoroughly.
All of these things I will be keeping in mind when I go towards advertising for my blog in the future. Hopefully you see fantastic results with your own Facebook Ads!
Until Next Time,
Caitlin Campbell
Remember how we talked about the popularity and importance of setting up Facebook Ads and then the process of actually setting Facebook Ads up? In this post I'm going to go over the results.

When first logging onto Facebook to check the progress of your ads you will come to screen much like the one featured above. I ended up doing two separate campaigns for this blog with only slight differences in wording and audience but all using the same image. So now let's go through and compare and analyze the differences in results.


First I am going to focus on the $20 ad that I placed from September 29th- October 3rd. This ad ended up resulting in 41 clicks and reached 2,351 people and costed me about $0.49 per click. With this campaign I had 3 variations in my ad, focusing on one of the three main marketing topics covered by this blog (SEO, Social Media, and Google Analytics). I had very slight differences in my target audience from this ad compared to my second campaign.
Overall this campaign applied more so towards males especially in the 35-44 age range. This I found surprising, I was expecting my blog to be more popular with the upper 20 somethings. Most of the traffic that I ended up getting came through Mobile News Feed, which if you read one of my recent posts on how frequently people use their smartphones and Facebook, shouldn't be surprising in the least.


This second campaign I ran for two days from October 8th- October 10th, for only $5. I was able to reach 10,404 people and got 32 website clicks and paid around $0.16 for each of them. Surprising results for only a fourth of what was spent on the first ad. These major differences I am contributing to the placement of the ad. For this second ad I had disabled the "display in news feed" option. Meaning that while I had taken away all my mobile ads for the desktop right column ad I got to pay substantially less for similar results. Again my ad appealed to males more so than females, but in substantially larger percentage than the last campaign. This time my ad appealed more so towards the 18-24 years old demographic, with very few older generation views. This I find surprising because I assumed that my mobile ads would be more appealing to younger generations than the ones that actually ended up clicking it.

Next I went to my Google Analytics account to see what my clickers of my ad actually ended up doing once they found themselves at my blog. It's a little disheartening to see that my bounce rate is as high as 77.17%, meaning that more that 3/4th of my viewers clicked away before actually exploring my blog or visiting other pages. The average session duration was just under two minutes, meaning that odds are my blogs aren't actually getting read thoroughly.
All of these things I will be keeping in mind when I go towards advertising for my blog in the future. Hopefully you see fantastic results with your own Facebook Ads!
Until Next Time,
Caitlin Campbell
Tuesday, October 6, 2015
Making your Social Media, How Often Should You Post
Hello Everybody,

This week I'm going to be talking about how frequently you should be posting from your various social media outlets. All the information I'll be covering are based off of articles, Infographic: How Often Should You Post on Social Media? See the Most Popular Research & Tips and Smartphone Users Check Facebook 14 Times a Day, Study Says.
Infographic: How Often Should You Post on Social Media? See the Most Popular Research & Tips

How much you post will vary on whether you are posting as an individual or as a company and which social media outlet you are using. As you can see from the infographic provided above you'll probably want to post the most to Pinterest, in which you will probably benefit the most from posting multiple times daily, about 6 posts or more. Twitter you'll want to stick with about 3 posts a day as engagement decreases after your 3rd tweet. Google + you should mostly focus on posting consistently at about 3 posts a day. If you start posting less than normal you may see decreases in engagement up to 50%. For Facebook can post about twice a day before your engagement drops dramatically. For Instagram aim to post about twice a day, but you can post more as long as you can keep up with quality content. For LinkedIn aim to post once every weekday.
Smartphone Users Check Facebook 14 Times a Day, Study Says

On average people spend about 32 minutes a day on Facebook through their smartphones. 44% of people use their phones as their alarm clock which may contribute to the fact that 79% of people check their phones within the first 15 minutes of waking up. Email is the only social media outlet used more often than Facebook. People are so attached to their phones that 25% of people can't remember when their phones weren't in the same room as them. The time people spend being social on their phone doubles on the weekends. 61% of people check their newsfeeds everyday. Keep this information in mind when deciding which direction you want to go when creating social media for your company.
Until next time,
Caitlin Campbell
Tuesday, September 29, 2015
Making Your Social Media, Facebook Ads
Hello Everybody,
Remember that post I made talking about the popularity of advertising on Facebook? Well, in this post I'm going to show you how to make them.
Since I have yet to have my website up and running, I have decided to advertise for this blog in order to reach more beautiful readers like yourself. So the first step is to head over to Facebook's advertising page. It is here that you're going to create your fantastic ad.
First it asks you want you're trying to accomplish with your ad. I myself am trying to get people to come visit this blog, so I chose the clicks to website option. I'm not sure if this effects the rest of the form information or not, so just keep in mind their might be some differences between how mine will get set up than yours.


Once that's all done you hit create ad, and it asks for you card information if it isn't linked to your account already. Once that goes through you get brought to a page where you can monitor your ad's progress. Mine is still currently under review so fingers crossed that it goes through without a hitch this time!

Until next time,
Caitlin Campbell
Remember that post I made talking about the popularity of advertising on Facebook? Well, in this post I'm going to show you how to make them.
Since I have yet to have my website up and running, I have decided to advertise for this blog in order to reach more beautiful readers like yourself. So the first step is to head over to Facebook's advertising page. It is here that you're going to create your fantastic ad.
First it asks you want you're trying to accomplish with your ad. I myself am trying to get people to come visit this blog, so I chose the clicks to website option. I'm not sure if this effects the rest of the form information or not, so just keep in mind their might be some differences between how mine will get set up than yours.

So then I just enter the URL to my blog and move on to the first section which asks for your account information. Simple enough.

But then it gets to the more difficult questions of who you want to reach. If you already have a target market in mind, great! This is where you'er going to enter in all the demographics of your target market. I however don't have such a clear cut target market. I extended my location to include India because it has cheaper click rates. I kept it fairly open age range and limited the language to English since that is what my blog is written in. I tried to focus on on people who might be looking for free Digital Marketing information such as a self-employed person and so on.


I then had to enter how much I wanted to spend. Seeing as I am a lowly college student I left it fairly low. However I must point out that there is a difference between lifetime budget and daily budget, so be sure to double-check what you're getting yourself into before your credit card gets depleted.

Next I had to move on to how I wanted my ads to look. Being a graphic designer this section kind of irked me with it's precise and limited amount of options, but that's just me. As I am writing this blog now I have just found out that my ad was not placed due to the images that they had picked out of my blog for me. So heads up, thumbs up icons are not allowed (which is totally fair and makes total sense I'm just a dash bitter). Maybe Facebook ads aren't completely painless and frustration free.
But anywho, you can pick just to have one image or multiple. I ended up choosing multiple even though I ended up switching them all to the same image. This way I could try out different titles and description tags to see which would work the most effective.


This is where you can choose what particular message you want to display with a specific image. I tried 3 different approaches. The first one I left as "Caitlin Campbell's Marketing Blog" with the description of "Digital Marketing". The second one I used "Learn Social Media Marketing" with the description of "Free Marketing Blog". The last one was "Learn Google Analytics and SEO" with the description of "Free Marketing Blog."

Once that's all done you hit create ad, and it asks for you card information if it isn't linked to your account already. Once that goes through you get brought to a page where you can monitor your ad's progress. Mine is still currently under review so fingers crossed that it goes through without a hitch this time!

Until next time,
Caitlin Campbell
Thursday, September 24, 2015
Making Your Social Media, Facebook : part 2
Hello Everybody,
Remember that Facebook page we created about 2 weeks ago?

Let's revisit that.
As you can see I haven't done much with it since I first created it for this blog, do as I say not as I do readers!
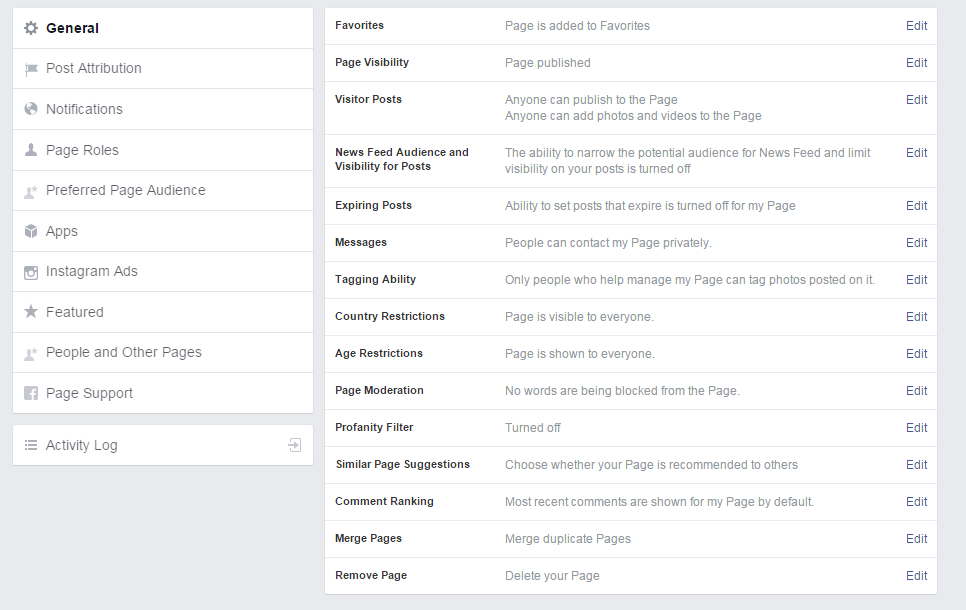
So now it is time to specify some information and try to attract views and likes and hopefully, some business. So I began poking around the settings tab at the top right for the screen.

And it comes up with only a bajillion things for you to go through.
But before you start stressing out, most of the options are self explanatory and the default settings usually have your best interests at heart. On top of that if you're unsure what some of the options mean, Facebook has inserted little explanations in their ? icons.


Ah okay then! That is something I want/don't want! Click/un-click!
The Post Attribution options has you choose when your posts, likes and comments default to your personal account or to your business one. I would leave this one default, because it will help your business/cause/organization to look more uniform and professional.
Next option is your Notifications. If your page is like mine, a brand new baby in the Facebook world, odds are you're not getting a lot of notifications. So I have my page set up so that I'll get a notification for each time there is activity on, or relating to my page. Once my page becomes widely popular (fingers crossed), I can switch it to get notifications every 12-24 hours, or just off. But for now, I want to know when things are happening to my page so I can stay on top of everything.
Next is Page Roles. This is something I was unaware of when making this page, but now that I see it, it makes perfect sense. You can assign the people who are working with you on your Facebook page to different roles. This is also where you can invite other people to work on your page with you.

Seeing as of right now I am a one man band, I don't have much need for this. But its always good to know.
Next is Preferred Page Audience. This allows you to set or change your preferred page audience.You may have already set this up when creating your page. So if you already know what type of demographics your target audience possesses, then you can enter those here. Or if you're like me and are unsure of what kind of crowds you're going to attract with your business, you can wait till your page gets some attention and look at the demographics of the people already viewing your page, then narrow in on that group to get more people and views.
Then we have Apps. They suggest things such as the events app or notes app. So really whatever floats your boat really. I personally don't see the need for these apps for my page yet.
Next is Instagram Ads. You can connect your Instagram account to your Facebook one! Oh my. I think I know which social media account I will be setting up next week for this blog.
Then we have Featured. This is more so when you like other pages- which I haven't done, or add page owners- which I don't have. One man band here.
Next we have People and Other Pages.

Seeing that no one or page has liked mine yet there is no information for me here. Let's revisit this in a hopefully more optimistic future post.
Then we have Page Support. This is where you can check the status of support requests.
Then there is the Activity Log which just shows your activity on your page.
Good luck tweaking those Facebook pages, until next time,
Caitlin Campbell
Remember that Facebook page we created about 2 weeks ago?

As you can see I haven't done much with it since I first created it for this blog, do as I say not as I do readers!
So now it is time to specify some information and try to attract views and likes and hopefully, some business. So I began poking around the settings tab at the top right for the screen.
But before you start stressing out, most of the options are self explanatory and the default settings usually have your best interests at heart. On top of that if you're unsure what some of the options mean, Facebook has inserted little explanations in their ? icons.


Ah okay then! That is something I want/don't want! Click/un-click!
The Post Attribution options has you choose when your posts, likes and comments default to your personal account or to your business one. I would leave this one default, because it will help your business/cause/organization to look more uniform and professional.
Next option is your Notifications. If your page is like mine, a brand new baby in the Facebook world, odds are you're not getting a lot of notifications. So I have my page set up so that I'll get a notification for each time there is activity on, or relating to my page. Once my page becomes widely popular (fingers crossed), I can switch it to get notifications every 12-24 hours, or just off. But for now, I want to know when things are happening to my page so I can stay on top of everything.
Next is Page Roles. This is something I was unaware of when making this page, but now that I see it, it makes perfect sense. You can assign the people who are working with you on your Facebook page to different roles. This is also where you can invite other people to work on your page with you.

Next is Preferred Page Audience. This allows you to set or change your preferred page audience.You may have already set this up when creating your page. So if you already know what type of demographics your target audience possesses, then you can enter those here. Or if you're like me and are unsure of what kind of crowds you're going to attract with your business, you can wait till your page gets some attention and look at the demographics of the people already viewing your page, then narrow in on that group to get more people and views.
Then we have Apps. They suggest things such as the events app or notes app. So really whatever floats your boat really. I personally don't see the need for these apps for my page yet.
Next is Instagram Ads. You can connect your Instagram account to your Facebook one! Oh my. I think I know which social media account I will be setting up next week for this blog.
Then we have Featured. This is more so when you like other pages- which I haven't done, or add page owners- which I don't have. One man band here.
Next we have People and Other Pages.

Then we have Page Support. This is where you can check the status of support requests.
Then there is the Activity Log which just shows your activity on your page.
Good luck tweaking those Facebook pages, until next time,
Caitlin Campbell
Thursday, September 17, 2015
Making Your Social Media, Twitter
Hello Everybody
In this post I'm going to talk about setting up my professional Twitter.
I'm going to be honest. I have not quite taken to Twitter as I have other social media outlets. Like just have a look at my own personal Twitter.

Clearly Twitter is not my favorite nor my natural forte. I follow next to no one, and even less bother to follow me. And I have only recently have been able to grasp the whole # bit. So clearly I'm going to need to look into outsourcing some information. Okay Google, here I come. Let's learn this together.
First let's review the basics of Twitter, and bear with me here while I sort out my own thoughts if it covers things you're familiar with. Twitter works as a type of short hand blog. You only get 140 characters per tweet. That means everything you share needs to be short, simple and to the point. There are tweets that can work together to share a larger communion of thought. You can link them through your # (hashtags). Hashtags work to link certain topics together. Whatever you use as your hashtag gets indexed by that certain social media and it become searchable for other users. Yeah, there not just annoying things young punks are into now a days, they have an actual functioning purpose.
Anyways, so I Googled how to make a professional Twitter, and who comes to my rescue but Twitter itself. They make accessing their ads incredible easy, similar to Facebook. They then show a snazzy example of a professional Twitter.

They also provide a list of helpful tips to keep in mind when creating a professional Twitter. Such as how to choose your @username, your profile photo (image size is 400x400 pixels), your bio, URL, header image, and pinned tweet. To see all the tips in their detail visit Twitter's Business Set Up page.
So now armed with Twitter's business set up page open in the background, here I go to set up my professional Twitter.
The first thing I think about when setting up my Twitter is how it's different than how Facebook is set up. With Facebook, you make your professional page through a current existing Facebook account, but with Twitter you have to use a whole separate account. So I log out of my personal Twitter, and get ready to begin all over again.

Starts easy enough.
It's pretty self explanatory as you go through the steps.


The deed is done! I have created the bare bones of a professional Twitter account.
I will soon blog about optimizing this Twitter account so that it actually does come off as professional. So keep posted and look out for my next blogs.
Until next time,
Caitlin Campbell
In this post I'm going to talk about setting up my professional Twitter.
I'm going to be honest. I have not quite taken to Twitter as I have other social media outlets. Like just have a look at my own personal Twitter.
First let's review the basics of Twitter, and bear with me here while I sort out my own thoughts if it covers things you're familiar with. Twitter works as a type of short hand blog. You only get 140 characters per tweet. That means everything you share needs to be short, simple and to the point. There are tweets that can work together to share a larger communion of thought. You can link them through your # (hashtags). Hashtags work to link certain topics together. Whatever you use as your hashtag gets indexed by that certain social media and it become searchable for other users. Yeah, there not just annoying things young punks are into now a days, they have an actual functioning purpose.
Anyways, so I Googled how to make a professional Twitter, and who comes to my rescue but Twitter itself. They make accessing their ads incredible easy, similar to Facebook. They then show a snazzy example of a professional Twitter.

So now armed with Twitter's business set up page open in the background, here I go to set up my professional Twitter.
The first thing I think about when setting up my Twitter is how it's different than how Facebook is set up. With Facebook, you make your professional page through a current existing Facebook account, but with Twitter you have to use a whole separate account. So I log out of my personal Twitter, and get ready to begin all over again.
It's pretty self explanatory as you go through the steps.


And Voila!

I will soon blog about optimizing this Twitter account so that it actually does come off as professional. So keep posted and look out for my next blogs.
Until next time,
Caitlin Campbell
Thursday, September 10, 2015
Making Your Social Media, Facebook
Hello Everyone,
For this second post for Social Media Marketing, while I have already covered the first chapter of What Color is Your Parachute in my Google Analytics blog, I thought it might be good to cover my process of making social media accounts for a new freelance business that I am in the process of starting up.
This December I am graduating with my Bachelors majoring in Graphic Arts and Design and a minor in Marketing. So before that happens I thought it should be time that I start up my own website. So about a week ago I finally purchased the domain name soupgraphicdesign.com (don't go visit it, there's nothing there, yet.. ;) ). Now it's time to get my hands on the social media accounts to build a social media presence. This one will be the Facebook edition.
Facebook
So first I start up Facebook by logging onto my current personal account. And I find the create a page option, which is easy enough since it is literally the first option.


For this second post for Social Media Marketing, while I have already covered the first chapter of What Color is Your Parachute in my Google Analytics blog, I thought it might be good to cover my process of making social media accounts for a new freelance business that I am in the process of starting up.
This December I am graduating with my Bachelors majoring in Graphic Arts and Design and a minor in Marketing. So before that happens I thought it should be time that I start up my own website. So about a week ago I finally purchased the domain name soupgraphicdesign.com (don't go visit it, there's nothing there, yet.. ;) ). Now it's time to get my hands on the social media accounts to build a social media presence. This one will be the Facebook edition.
So first I start up Facebook by logging onto my current personal account. And I find the create a page option, which is easy enough since it is literally the first option.

After that though it got a little more difficult. You pick what kind of page you want to create. I wasn't sure what option I landed under, but thankfully when you click on the icon they list a bunch of different specific labels that kind of help you figure out where you belong. Unfortunately I really thought that I belonged as a Brand or Product, because I'm trying to build up a brand for myself. But there was no "art," "graphic design," "design" or "other" option, so I ended up making a public person page instead with the label designer. This isn't so bad because I knew that I wanted to make one of these eventually anyways.

Next I had to set up the account. This likely varies based on the option chosen. Here are steps I went through to create my page.


Once you get through all that don't worry, there's only a million and two ways to customize your actual page. So be ready to dedicate some real time and effort to get this up and off the ground, along with the time to keep it updated and going once things start up.

So keep your chin up and hit the ground running,
Until next time,
Caitlin Campbell
Subscribe to:
Posts (Atom)